Hansebubeforum
Registrieren || Einloggen || Hilfe/FAQ || Suche || Memberlist || Home || Statistik || Kalender || Staff Willkommen Gast!


Hansebubeforum » 1/50 » LTM1300 a la Mammoet » Threadansicht

Autor Thread - Seiten: -1-
000 — Direktlink
28.11.2008, 01:07 Uhr
bobm2004


Part One

Greetings from the USA. I would like to welcome you to my show. Its been a while since we have been in the kitchen together, so lets roll up our sleeves, put on our aprons and dive right into this special holiday addition of our show!

Today we have a special treat for all of you and something I will think you will like. The recipe is a bit complex, but uses basic techniques that we have developed over the past episodes. We are going to start out with a plain old yucky Liebherr LTM1300 and whip it into shape by converting it to one of our favorite flavors, Mammoet. And because this is a special holiday addition, lets do a double batch! That’s right not one, but two make over’s at once!!

We start by heading to our local market, such as DHS, and obtain two LTM1300’s. It is important to choose units at their peak of freshness, not to green and not to ripe. Ahhhhhhhhh just right!


Now very carefully we peel off the outer sleeve to reveal the soft, but firm, white interior. Now very carefully, we split the white shell to yield the fruit and object of today’s cooking lesson.


Now, after washing your hands, very carefully remove the crane fruit and parts and lay them out.


Now we get down to business, tear down. Get them tools out and start pulling screws, pins and pulleys till the units cannot be broken down any further. AS we have done this many times together I will spare you the gruesome details.


Get the units stripped and ready for paint.


And lets get things that need to be red, well red!! Jib sections, boom sections, cabs an under stripes!


And know for some masking and painting. The out riggers have an awesome set of warning stripes on them and it seems a shame to waste them, so don’t. Mask, paint and remove!


And know for some of my favorite parts of the job, masking and under stripping. First you have to mask the parts!!


Then give them the paint and its time for the reveal-my favorite part!!


And we finish this episode with applying all the black.


We are out of time for this episode! I hope you have enjoyed it and have been keeping up with your own conversion of the LTM1300. Look for us soon in the next episode when we see how the assembly and decaling of this fine holiday dish is completed!!!

(Some nice looking men in the white suites are knocking at the door, I wonder what they want………………….)

Dieser Post wurde am 28.11.2008 um 01:10 Uhr von bobm2004 editiert.
Seitenanfang Seitenende
Profil || Private Message || Suche Zitatantwort || Editieren || Löschen || IP
001 — Direktlink
28.11.2008, 01:11 Uhr
bobm2004


Part 2

Welcome back to the show everyone. In our second installment of LTM1300 a la Mammoet we are going to pick up right were we left off last time. We had started a double batch of LTM1300, had managed to extract them, disassemble them and got them painted in red and black. Today its time to try and get this mess of parts back into some semblance of order.

We start with the chassis, add the deck plating and install our fancy painted out riggers .


Add the cab, engine compartment, exhaust stack and wheels and rimms


Setting the truck carrier aside we stack the counter weights to make sure our paint on the wholes and posts had not built up to thick to prevent smooth and easy stacking, ah perfect!!


Now we start work on the crane section, starting with reattaching the super lift to the main boom


Then attach the pennant lines and the main boom to the carrier, installing the main lift cylinders as we go


Attach the cab and carrier shrouds and prepare to attach the crane to the chassis


Ah, perfecto, its starting to look a little bit like a crane!


Insert all of the boom sections and it looks just like a real crane!


Now repeat this again and we are nearing the completion of the double batch!


And once again we have run out of time-darn!! Well we have to wait till next time to see our completed project.

Bon a petite
Seitenanfang Seitenende
Profil || Private Message || Suche Zitatantwort || Editieren || Löschen || IP
002 — Direktlink
28.11.2008, 03:38 Uhr
19_Rocky_90


Wow, great painting work, and nice to see step for step!
--
Schöne Grüsse
Klaus
- - - - - -
www.flickr.com/photos/rockenbauer
Wer denkt, gefährdet die Dummheit
Seitenanfang Seitenende
Profil || Private Message || Suche Zitatantwort || Editieren || Löschen || IP
003 — Direktlink
28.11.2008, 10:22 Uhr
Sebastian Suchanek
Admin
Avatar von Sebastian Suchanek

Nice idea with the cooking show and good work also. Congrats!


Bye,

Sebastian
--
Baumaschinen-Modelle.net - Schwerlast-Rhein-Main.de
Seitenanfang Seitenende
Profil || Private Message || Suche Zitatantwort || Editieren || Löschen || IP
004 — Direktlink
28.11.2008, 10:35 Uhr
Stephan
Moderator
Avatar von Stephan

Please give us a spezial tip: How did you painted the plastic parts? What kind of coulor did you use for?

I often get problems with fixing the coulor on such plastic parts.


Thanks a lot an Gruß vom Rhein
Stephan
--
Gruß vom Rhein
Stephan

"Hätten Sie aber können!!!"
Seitenanfang Seitenende
Profil || Private Message || Suche Zitatantwort || Editieren || Löschen || IP
005 — Direktlink
28.11.2008, 14:59 Uhr
gastkran

Avatar von gastkran

It`s looks very great.Good job bobm 2004.


Greetings from Vienna
--
.
.
Gruß aus Wien Alex
Copyright meiner Bilder liegt bei mir.
Seitenanfang Seitenende
Profil || Private Message || Suche Zitatantwort || Editieren || Löschen || IP
006 — Direktlink
29.11.2008, 18:20 Uhr
bobm2004


Stephan-

On the plastic parts I use a paint from Rust Oleum called Paint for Plastic. It is advertised as being for direct application to plastic and to have been formulated to adhere to plastic with out flaking or chipping off. It is available in what I would call base colors, red, black, white, blue, yellow, green etc...After a little experimentation here is how I use it:

I warm the plastic parts up slightly with either a blow drier or hot water

I use the Rust Oleum paint color, in this case red, as a primer coat directly on the plastic

I then paint a top coat over the part with the actual color being used for the model.

This usually yields a color match very, very close to the desired color. The underlying plastic paint coats color winds up being somewhat neutral and does not add or take away all that much from the top finish coat of paint.

Thanks.

Bob
www.bobscranes.com

Dieser Post wurde am 29.11.2008 um 18:21 Uhr von bobm2004 editiert.
Seitenanfang Seitenende
Profil || Private Message || Suche Zitatantwort || Editieren || Löschen || IP
007 — Direktlink
30.11.2008, 06:25 Uhr
bobm2004


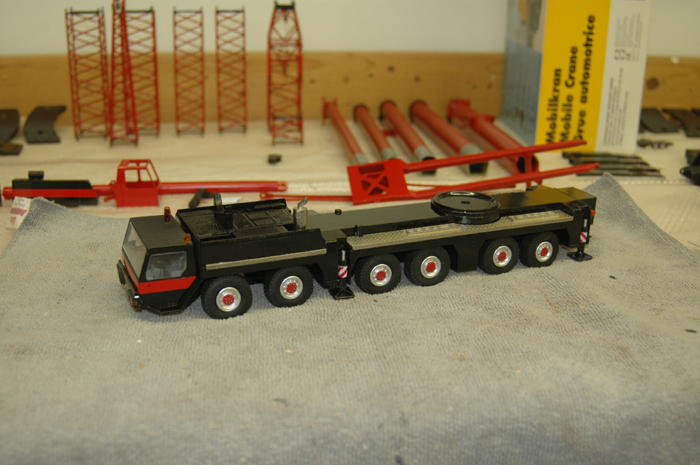
Welcome back again viewers!! We are in are final installment of the double batch of LTM1300 a la Mammoet. In today's episode we are going to add the final details to the LTM’s and present them to all!! I hope to share some of my extra little tricks and tips that really in the end make the meal that much more enjoyable. When we last left, we had finished the painting and assembly. Now for the final garnish!!


As always a clean, well light and organized work space helps make the job easier, especially when you have access to the internet and files sent by forum friend Emiel as reference for painting and decaling.


I always start out with the safety stripping as it is the least “fun” of the decaling. I make my own safety stripping sheets using a CAD program called Turbo Cad, a program that cost $30-40 and provides excellent scaling control. I make whole sheets of the safety stripping and of safety triangles. I use white water slide decal paper, using either laser or ink jet depending on which printer I have available, and then spray them with clear coat gloss.


Another key ingredient to the success of the recipe, though seldom tasted, is a decal applying solution. This solution allows for the decals to be positioned before they adhere to the surface, allowing you to get the decals just right. The other thing this one does is it sucks the decal to the surface, very handy when affixing decals to uneven surfaces. I use this product, however there are others with similar properties.


So cut a decal, soak it in water and apply a little decal solution, position the decal and slide off the paper. You can use tweezers, but be careful so as not to rip the decal, then dab with paper towel to remove excess moisture.


And finally, using our reference pictures, we have the unit decaled!


And what recipe would be compete without having to do several dozen counter weight triangles. Do not rush this point as it ultimately looks cool!


Folks, its all in the details that make or break our presentations with the food critics. On all of my models I make a special little piece, takes just a few minutes and pennies worth of material. A sheet of plastisrut, small black chain and some super glue


Turn your model on the side and attach in the front center of the model


Add a bit of black paint and at da, you have a hook keeping chain!!!


And with this final detail, I present to you LTM1300 a la Mammoet!


I do hope you have enjoyed our show! If you would like to try this recipe at home you can always visit our website, www.bobscranes.com, for a copy, as well as check your local listings as this show is now in syndication! Until next time, may al your cranes be a la Mammoet!!
Seitenanfang Seitenende
Profil || Private Message || Suche Zitatantwort || Editieren || Löschen || IP
008 — Direktlink
30.11.2008, 08:26 Uhr
Burkhardt
Admin
Avatar von Burkhardt

Hi Bob,

nice work
--
Beste Grüße aus dem Alstertal und den Vierlanden, in Hamburg

Burkhardt Berlin
---


...ein dickes Fell? Das hatte ich früher nie... ich habs mir wachsen lassen...
Seitenanfang Seitenende
Profil || Private Message || Suche Zitatantwort || Editieren || Löschen || IP
Seiten: -1-     [ 1/50 ]  


Linktips:

Kranliste von Carsten Thevessen

Kran-und Schwerlast-FAQ von Sebastian Suchanek

RAL Farbliste von Burkhardt Berlin


Hansebube.de - Modellbau und Vorbild

powered by ThWboard 3 Beta 2.84
© by Paul Baecher & Felix Gonschorek


Impressum und rechtliche Hinweise
Datenschutzerklärung